Official Google Blog: Download the classics
Thanks....
Home Full Download, Home Crack Serial, Home Rapidshare links, Home Warez Download, Home Free Full Download, Home Torrent CDKey, Home Nocd Patch
Direct links, rapidshare links, easy-share links,… download full softwares, portable appz, games, ebooks, movies, music,script,…and MORE… http//indogear.com
black rose

satu objek yang sangat gw kagumi
Rabu, 08 Juli 2009
Rabu, 23 Juli 2008
IP Changer 2.0

IP Changer 2.0 doesn’t require system rebooting when you change desktop or notebook’s TCP/ IP. It can change your desktop’s network setting with only one-click and also supports static IP and DHCP.
Download
GamesXCopy 1.0.8

GamesXCopy by 321 Studios was once a big player in the game copy software arena, but now that 321 Studios is out of business, no support exists for this product. As game copying software goes, GamesXCopy is extremely easy to install and a snap to use.
Ease of Use:
GamesXCopy is simple and straight forward, allowing you to make an exact copy of your game and burn it to a CD quickly. The program is easy to navigate; each section uses easy-to-understand icons to communicate options.
In Expert Mode, you have specific options that allow you to alter your copy and change the way it is burned to disc.
Ease of Setup:
We did not experience any problems while installing GamesXCopy.
Feature Set:
We appreciated the look of GamesXCopy's virtual drives. You are allowed to have up to four separate drives running simultaneously. We also found that the GamesXCopy's virtual drive functions had some difficulty running games protected by SecuROM, but didn't have any problems running games protected by SafeDisk. We did find, however, that GamesXCopy would successfully burn games protected by SecuROM without any problems. This software also offers an ATIP Hide function.
Quality of Copy:
All the backup copies we made with GamesXCopy worked flawlessly. During game play we couldn't tell the difference between the original and the backup copy.
Protection Removal:
GamesXCopy does a fine job overcoming most game protections. The biggest drawback is that 321 Studios is no longer in business, so there will not be any new updates for future game protections.
(Note: You must modify XBox and PS2 consoles before copied games can be played on them and XBox games also require a DVD Burner and additional software to make a working copy).
Help/Documentation:
As 321 Studios is no longer in business, there is no support for GamesXCopy. There is a helpful manual that walks you through the software's different capabilities and options.
Summary:
At one time, GamesXCopy by 321 Studios had the potential to become a major force in the game copy world, but now the program is a decent tool that will quickly become obsolete.
Download Rapid
Download Megaupload
Download Accelerator Plus 8.6.6.2 Final

Download Accelerator Plus 8.6.6.2 Final
Download Accelerator Plus enables you to pause and resume downloads, and to recover from a dropped Internet connection.
In addition, DAP searches for mirrors and implements the downloads from the best or most responsive mirrors. It is configured by default to automatically Integrate into your Explorer or Netscape browser when it is installed, and to self-activate each time a download is performed.
No further configuration or action is required on your part - simply use your browser to access the desired site, click on the download file, and respond to the self-explanatory DAP dialogs that appear.
Advanced options enable you to tailor the operation and responses of the application to your needs. You can choose to trigger specific responses such as messages, queue update, closing the application, and disconnecting after the download is completed or is not available.
DAP is fully integrated into the browser, providing the best possible performance from ANY Internet connection, broadband and narrowband (cable, DSL / ADSL, T1, dial-up etc.).
DAP will allow you to benefit from a faster and more reliable download experience, optimize your download performance, and help you to recover interrupted downloads. DAP is available in two versions: a Free version (ads. supported) and a Premium version (with a richer set of features and no ads.).
This download is marked as adware because it displays advertisement banners or other type of commercials while running.
Download
Rabu, 11 Juni 2008
Tips 1 Belajar Windows
1. Menghilangkan Prefetch (ini adalah file log history windows,biasanya memperlambat kinerja windows)
* run “regedit”;
* cari [HKEY_LOCAL_MACHINESYSTEM CurrentControlSetControl Session Manager Memory Management PrefetchParameters EnablePrefetcher];
* ubah nilainya menjadi 0 (disable)
* reboot
2. Menghilangkan Recent Document
* run “gpedit.msc”
* klik Administrative Templates di bawah User Configuration
* klik Start Menu and taksbar
* klik Do not keep history of recenly opened documents
* pilih enabled
3. Membersihkan Recent Document
* run “gpedit.msc”
* klik Administrative Templates di bawah User Configuration
* klik Start Menu and taksbar
* klik Clear history of recenly opened documents on exit
* pilih enabled
4. Memodifikasi “Send To” pada klik kanan
* Explorer -> C:Documents and Settings -> klik folder Administrator (atau sesuai dengan username kamu)
* Tools -> Folder Option -> View -> Show hidden File and Folder (untuk menampilkan file yang tersembunyi)
* Klik folder ‘Send To’
* modifikasi (hapus atau buat shortcut baru) yang mau kamu tampilkan pada klik kanan ‘Send To’, bila kamu menghapus semua shortcut maka yang ditampilkan pada klik kanan ‘Send To’ hanyalah removable device semisal flashdisk
5. Mengembalikan ‘Show hidden File and Folder’ jika hilang atau terkena virus
* copy paste script di bawah pada Notepad lalu simpan dengan ekstensi .reg , misal hidden.reg
double klik file hidden.reg
[HKEY_LOCAL_MACHINESOFTWAREMicrosoftWindowsCurrentVersion ExplorerAdvancedFolderHidden]
“Text”=”@shell32.dll,-30499″
“Type”=”group”
“Bitmap”=hex(2):25,00,53,00,79,00,73,00,74,00,65,00,6d,00,52,00,6f,00,6f,00,74,
00,25,00,5c,00,73,00,79,00,73,00,74,00,65,00,6d,00,33,00,32,00,5c,00,53,00,
48,00,45,00,4c,00,4c,00,33,00,32,00,2e,00,64,00,6c,00,6c,00,2c,00,34,00,00,
00
“HelpID”=”shell.hlp#51131″
[HKEY_LOCAL_MACHINESOFTWAREMicrosoftWindowsCurrentVersion ExplorerAdvancedFolderHiddenNOHIDDEN]
“RegPath”=”SoftwareMicrosoftWindowsCurrentVersionExplorerAdvanced”
“Text”=”@shell32.dll,-30501″
“Type”=”radio”
“CheckedValue”=dword:00000002
“ValueName”=”Hidden”
“DefaultValue”=dword:00000002
“HKeyRoot”=dword:80000001
“HelpID”=”shell.hlp#51104″
[HKEY_LOCAL_MACHINESOFTWAREMicrosoftWindowsCurrentVersion ExplorerAdvancedFolderHiddenSHOWALL]
“RegPath”=”SoftwareMicrosoftWindowsCurrentVersionExplorerAdvanced”
“Text”=”@shell32.dll,-30500″
“Type”=”radio”
“CheckedValue”=dword:00000001
“ValueName”=”Hidden”
“DefaultValue”=dword:00000002
“HKeyRoot”=dword:80000001
“HelpID”=”shell.hlp#51105″
6. Membuat Shorcut tanpa nama
* klik kanan shorcut
* rename
* tahan Alt+255 (ini adalah kode Ascii untuk ‘Space’, kalo tidak salah)
7. Menghilangkan Recycle Bin dari dekstop icon
* run “gpedit.msc”
* klik Administrative Templates di bawah User Configuration
* klik Dekstop
* klik Remove Recycle Bin Icon from dekstop
* pilih enabled
8. Memperbaiki Registry Windows :
* run “cmd”
* ketik “scanreg/restore”
9. Menghilangkan Run Dari start menu
* run “gpedit.msc”
* klik Administrative Templates di bawah User Configuration
* klik Start Menu and taksbar
* klik Remove Run from Start menu
* pilih enabled
10. Membuat background image pada drive atau flashdisk
* dari explorer pilih “Tools”
* pilih ‘Show hidden file’ dan uncheck ‘hide protected operating system file’
* OK
- misal, klik pada drive D: buat file dekstop.ini
- isi dengan beberapa baris di bawah ini :
[.ShellClassInfo]
[{BE098140-A513-11D0-A3A4-00C04FD706EC}]
Attributes=1
IconArea_Image=image.jpg
IconArea_Text=0×0000FF
- save
- kembalikan ’show hidden file’ & ‘hide protected OS file’ ke kondisi semula (opsional)
- untuk flashdisk,copy paste file dekstop.ini beserta image yang ingin ditampilkan ke flasdisk kamu
Ket :
IconArea_Image=image.jpg -> mengarah pada nama file image kamu (nama harus sama,gunakan path jika image berbeda folder)
IconArea_Text=0×0000FF -> mengarah pada warna tulisan untuk foldermu (format blue-green-red) jadi,jika warna merah yang seharusnya RGB FF0000 menjadi BGR 0000FF,jika ingin warna hitam maka ganti dengan 0×000000
Modify Windows XP dengan Nlite
Kasus:
Microsoft® Windows™ XP Pro SP2 kemasan CD tidak dapat mengenali chipset Intel® 82801GBM SATA AHCI Controller (Mobile-ICH7M) sehingga pada saat instalasi harddisk SATA dianggap tidak ada.
Solusi:
Melakukan pemutakhiran pustaka (driver) pada sistem operasi versi kemasaan CD.
Peralatan:
- Perangkat lunak berlisensi freeware nLite™ versi 1.4.5 beta2 sebesar 2576KB yang dapat diunduh dari sana atau dari sini.
- Berkas pemutakhir OS untuk chipset Intel® 82801GBM SATA AHCI Controller (Mobile-ICH7M) sebesar 169KB versi penulis, silakan unduh dari sini.
Catatan:
Pada metode instalasi desktop PC dengan kelengkapan floppy disk drive tidak akan menemui kendala berarti karena pada saat instalasi, pemutakhiran dapat diarahkan ke media floppy disk. Namun pada metode instalasi perangkat `floppyless` semacam notebook keluaran masa kini akan sangat menyulitkan. Untuk metode instalasi ke-2 itulah posting ini saya tulis.
Langkah-langkah:
Lakukan instalasi nLite™ versi 1.4.5 beta2, lalu jalankan.

Gambar-1. Welcome screen nLite™

Gambar-2. Pada jendela sumber, klik tombol `Browse`.
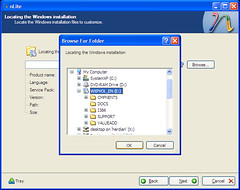
Gambar-3. Arahkahan ke drive sumber di mana master OS berada, contoh `E:`
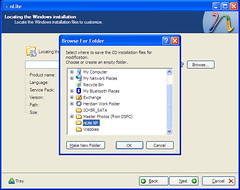
Gambar-4. Arahkan ke folder penampung hasil modifikasi. Jika perlu ciptakan folder baru, contoh `nLite XP`.
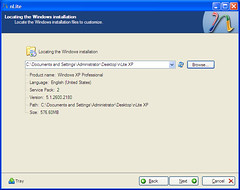
Gambar-5. Hasil proses duplikasi OS dari drive sumber ke folder penampung yang berisikan informasi lengkap mengenai OS yang akan dimodifikasi.
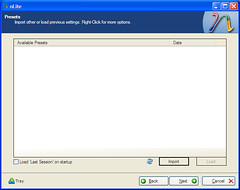
Gambar-6. Jendela preset, berguna untuk mengelola sesi modifikasi yang pernah dilakukan. Lewati saja jika ini sesi baru.
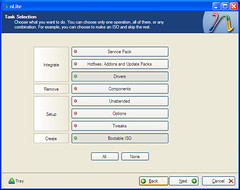
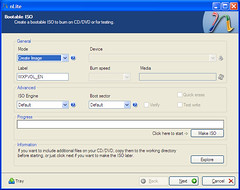
Gambar-7. Jendela seleksi task. Aktifkan tombol `Drivers` pada klasifikasi `Integrate` dan tombol `Bootable ISO` pada klasifikasi `Create`.
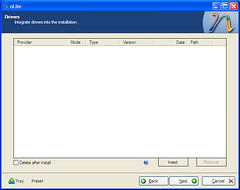
Gambar-8. Jendela integrasi drivers. Klik `Insert` lantas pilih `Multiple driver folder`.
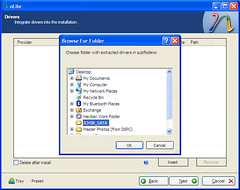
Gambar-9. Arahkan ke folder di mana berkas pemutakhir chipset Intel® 82801GBM SATA AHCI Controller (Mobile-ICH7M) telah diunduh dan dimekarkan sebelumnya, contoh folder `ICH5R_SATA` yang kebetulan saya letakkan di desktop.
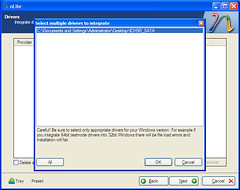
Gambar-10. Jika berkas pemutakhir valid, akan tampil jendela ini. Klik tombol `All`.
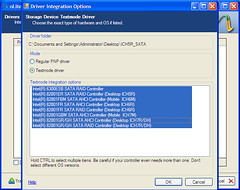
Gambar-11. Jendela opsi integrasi. Pastikan mode-nya `Textmode driver`. Jika perlu, pilihlah semua (Ctrl-A) tipe pada kolom `Texmode integration options`. Namun jika dikehendaki lain, pilihlah sesuai keperluan.
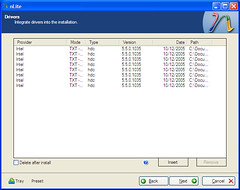
Gambar-12. Jendela driver list yang berisikan daftar pemutakhir yang akan diintegrasikan.
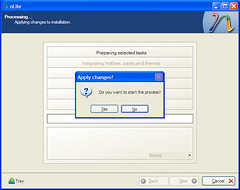
Gambar-13. Verifikasi integrasi. Klik tombol `Yes` untuk memulai proses integrasi atau tombol `No` untuk melakukan perbaikan pada setting sebelumnya.
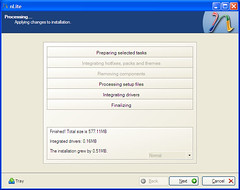
Gambar-14. Jendela informasi integrasi yang telah diproses. Klik tombol `Next`.
Gambar-15. Jendela opsi bootable ISO. Suntinglah sesuai keinginan. Pada langkah ini hasilnya bisa langsung diletakkan ke CD atau dibuat menjadi berkas ISO terlebih dahulu. Saran saya, buatlah menjadi berkas ISO. Klik tombol `Make ISO`.
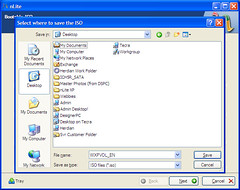
Gambar-16. Arahkan berkas ISO tersebut ke folder di mana berkas ISO tersebut akan disimpan.
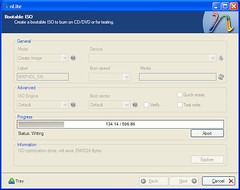
Gambar-17. Jendela proses pembuatan berkas ISO. Tunggu saja…
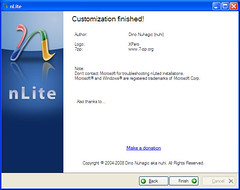
Gambar-18. Jendela selesai. Silakan baca note yang ada di situ.
Tahapan integrasi telah selesai dikerjakan. Selanjutnya berkas ISO baru tersebut bisa dieksplorasi lebih lanjut atau langsung dibakar menggunakan pembakar favorit.
Untuk keperluan lain, semisal membuat unattended OS installation atau melakukan setelan khusus sesuai selera, tools nLite™ ini dapat melakukannya dengan antar muka yang cukup mudah dimengerti. Cobalah jelajahi setelan-setelan yang lain pada jendela seleksi task (gambar-7).
Sedikit saran, pergunakanlah virtual drive atau image drive tools sesuai selera agar proses modifikasi berlangsung cepat dan dapat mengurangi risiko gagal baca —terutama jika sumbernya dari CD— pada saat duplikasi.
Selamat mencoba…
Selasa, 10 Juni 2008
Google Earth Pro-Gold Edition 2008
 Google Earth is a virtual globe program that lets you surf through our entire planet. You can zoom and search for your town and much more things such as school, churches etc! Google Earth Pro (Gold) is the upgraded version, it has alot of more features such as movie making or advanced printing and much more... Worth 400 $
Google Earth Pro combines the power of Google Search with satellite imagery, maps, terrain and 3D buildings to put the world's geographic information at your fingertips.
* Fly to your house. Just type in an address, press Search, and your17;ll zoom right in.
* Search for schools, parks, restaurants, and hotels. Get driving directions.
* Tilt and rotate the view to see 3D terrain and buildings, or look up to explore the sky
* Save and share your searches and favorites.
Download
Langganan:
Komentar (Atom)
